Quantcast
Channel: Android – googblogs.com
Viewing all 1776 articles
Browse latest View live

Alternative input methods for Android TV

$
0
0

Posted by Benjamin Baxter, Developer Advocate and Bacon Connoisseur

Hero image displaying phones and tvs communicating to each other

All TVs have the same problem with keyboard input: It is very cumbersome to hunt and peck for each letter using a D-pad with a remote. And if you make a mistake, trying to correct it compounds the problem.

APIs like Smart Lock and Autofill, can ease user's frustrations, but for certain types of input, like login, you need to collect complex input that is difficult for users using the on-screen keyboard.

With the Nearby Connections API, you can use a second screen to gather input from the user with less friction.

How Nearby Connections works

From the documentation:

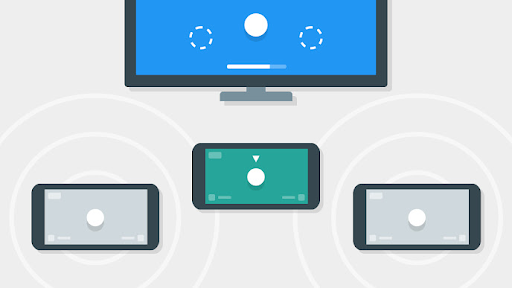
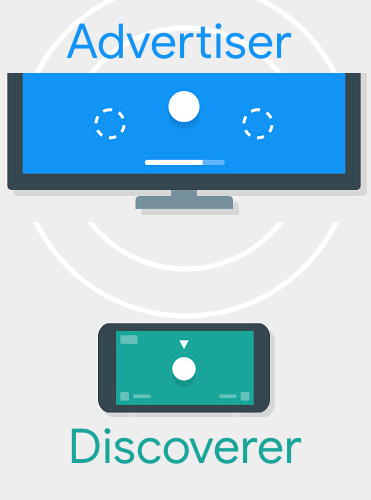
"Nearby Connections is an offline peer-to-peer socket model for communication based on advertising and discovering devices in proximity.

Usage of the API falls into two phases: pre-connection, and post-connection.

In the pre-connection phase, Advertisers advertise themselves, while Discoverers discover nearby Advertisers and send connection requests. A connection request from a Discoverer to an Advertiser initiates a symmetric authentication flow that results in both sides independently accepting (or rejecting) the connection request.

After a connection request is accepted by both sides, the connection is established and the devices enter the post-connection phase, during which both sides can exchange data."

In most cases the TV is the advertiser and the phone is the discoverer. In the example below, the assumed second device is a phone. The API and patterns described in this article are not limited to a phone. For example, a tablet could also be the second screen device.

The TV is the Advertiser and the phone is the Discoverer.

Login Example

There are many times when keyboard input is required. Authenticating users and collecting billing information (like zip codes and name on card) are common cases. This example handles a login flow that uses a second screen to see how Nearby Connections can help reduce friction.

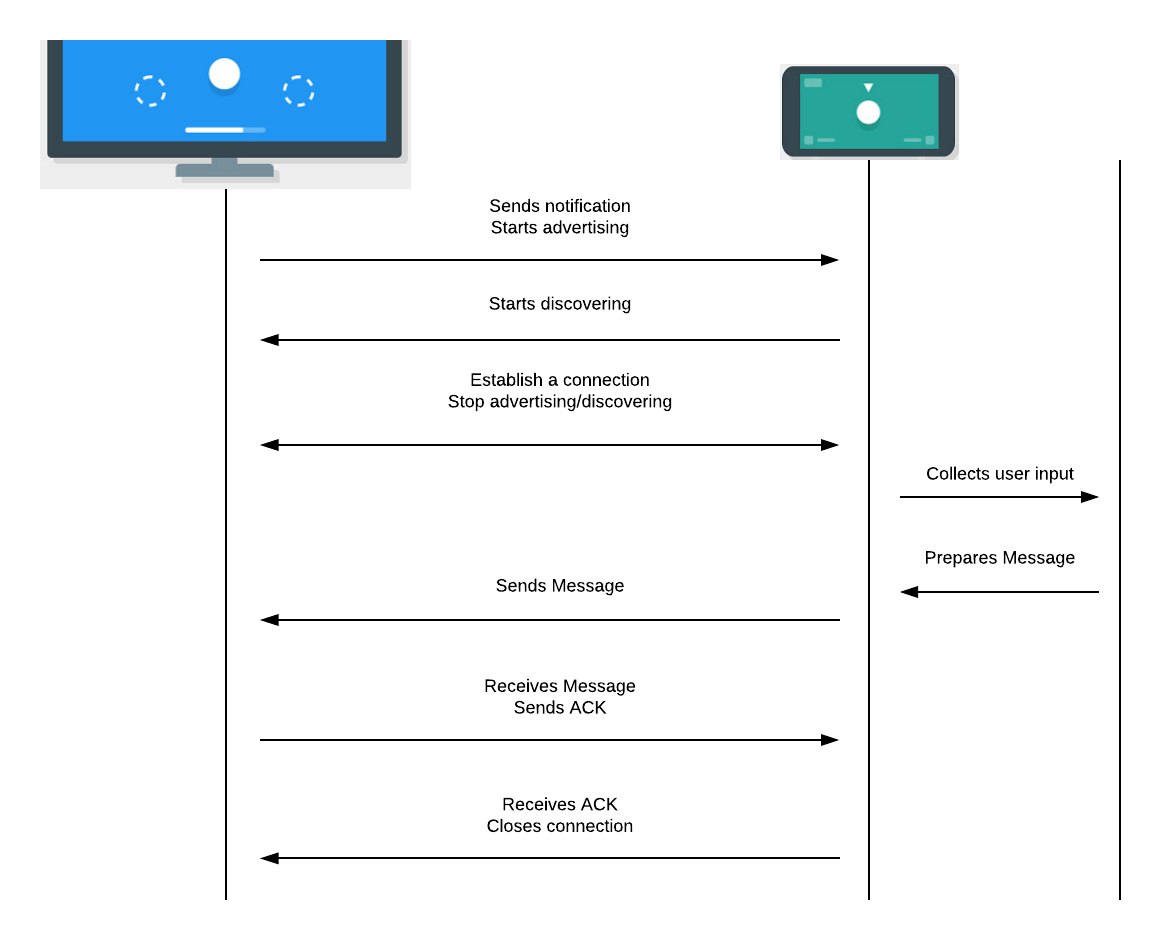
1. The user opens your app on her TV and needs to login. You can show a screen of options similar to the setup flow for a new TV.

Android TV setup with prompt to continue on the user's phone.

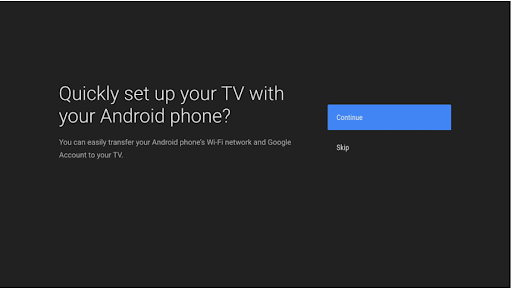
2. After the user chooses to login with their phone, the TV should start advertising and send the user to the associated login app on their phone, which should start discovering.

There are a variety of solutions to open the app on the phone. As an example, Android TV's setup flow has the user open the corresponding app on their mobile device. Initiating the hand-off is a more a UX concern than a technology concern.

Animation showing setup hand off from TV to phone.

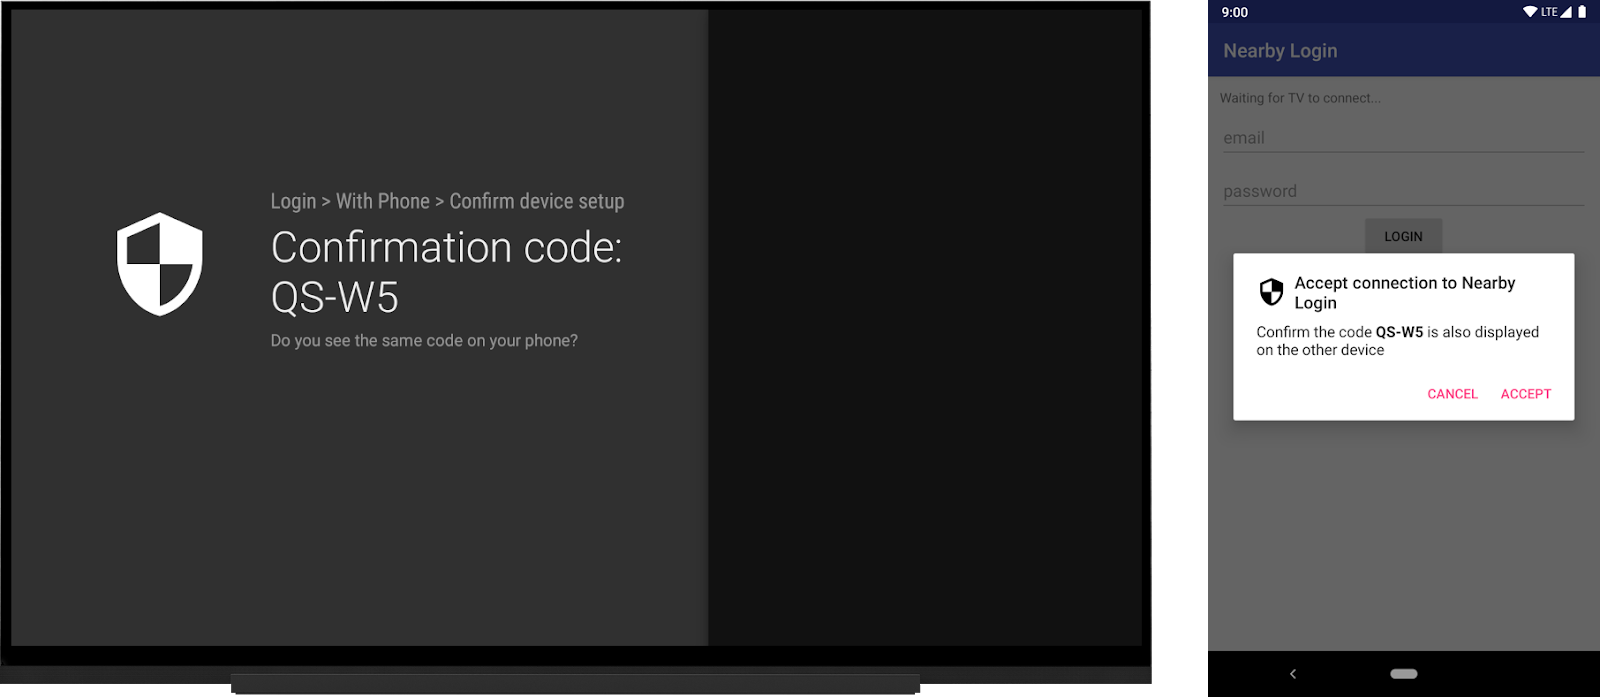
3. The phone app should display the advertising TV and prompt the user to initiate the connection. After the (encrypted -- see Security Considerations below for more on this) connection is established the TV can stop advertising and the phone can stop discovering.

"Advertising/Discovery using Nearby Connections for hours on end can affect a device's battery. While this is not usually an issue for a plugged-in TV, it can be for mobile devices, so be conscious about stopping advertising and discovery once they're no longer needed."

4. Next, the phone can start collecting the user's input. Once the user enters their login information, the phone should send it to the TV in a BYTES payload over the secure connection.

5. When the TV receives the message it should send an ACK (using a BYTES payload) back to the phone to confirm delivery.

6. When the phone receives the ACK, it can safely close the connection.

The following diagram summarizes the sequence of events:

Sequence diagram of order of events to setup a connect and send a message.

UX considerations

Nearby Connections needs location permissions to be able to discover nearby devices. Be transparent with your users. Tell them why they need to grant the location permission on their phone.

Since the TV is advertising, it does not need location permissions.

Start advertising: The TV code

After the user chooses to login on the phone, the TV should start advertising. This is a very simple process with the Nearby API.

override fun onGuidedActionClicked(action: GuidedAction?) {
    super.onGuidedActionClicked(action)
    if( action == loginAction ) {
        // Update the UI so the user knows to check their phone
        navigationFlowCallback.navigateToConnectionDialog()
        doStartAdvertising(requireContext()) { payload ->
            handlePayload(payload)
        }
    }
}

When the user clicks a button, update the UI to tell them to look at their phone to continue. Be sure to offer a way to cancel the remote login and try manually with the cumbersome onscreen keyboard.

This example uses a GuidedStepFragment but the same UX pattern applies to whatever design you choose.

Advertising is straightforward. You need to supply a name, a service id (typically the package name), and a `ConnectionLifeCycleCallback`.

You also need to choose a strategy that both the TV and the phone use. Since it is possible that the users has multiple TVs (living room, bedroom, etc) the best strategy to use is P2P_CLUSTER.

Then start advertising. The onSuccessListener and onFailureListener tell you whether or not the device was able to start advertising, they do not indicate a device has been discovered.

fun doStartAdvertising(context: Context) {
    Nearby.getConnectionsClient(context).startAdvertising(
        context.getString(R.string.tv_name),
        context.packageName,
        connectionLifecycleCallback,
        AdvertisingOptions.Builder().setStrategy(Strategy.P2P_CLUSTER).build()
    )
    .addOnSuccessListener {
        Log.d(LoginStepFragment.TAG, "We are advertising!")
    }
    .addOnFailureListener {
        Log.d(LoginStepFragment.TAG, "We cannot start advertising.")
        Toast.makeText(
            context, "We cannot start advertising.", Toast.LENGTH_LONG)
                .show()
    }
}

The real magic happens in the `connectionLifecycleCallback` that is triggered when devices start to initiate a connection. The TV should accept the handshake from the phone (after performing the necessary authentication -- see Security Considerations below for more) and supply a payload listener.

val connectionLifecycleCallback = object : ConnectionLifecycleCallback() {

    override fun onConnectionInitiated(
            endpointId: String, 
            connectionInfo: ConnectionInfo
    ) {
        Log.d(TAG, "Connection initialized to endpoint: $endpointId")
        // Make sure to authenticate using `connectionInfo.authenticationToken` 
        // before accepting
        Nearby.getConnectionsClient(context)
            .acceptConnection(endpointId, payloadCallback)
    }

    override fun onConnectionResult(
        endpointId: String, 
        connectionResolution: ConnectionResolution
    ) {
        Log.d(TAG, "Received result from connection: ${connectionResolution.status.statusCode}")
        doStopAdvertising()
        when (connectionResolution.status.statusCode) {
            ConnectionsStatusCodes.STATUS_OK -> {
                Log.d(TAG, "Connected to endpoint: $endpointId")
                otherDeviceEndpointId = endpointId
            }
            else -> {
                otherDeviceEndpointId = null
            }
        }
    }

    override fun onDisconnected(endpointId: String) {
        Log.d(TAG, "Disconnected from endpoint: $endpointId")
        otherDeviceEndpointId = null
    }
}

The payloadCallback listens for the phone to send the login information needed. After receiving the login information, the connection is no longer needed. We go into more detail later in the Ending the Conversation section.

Discovering the big screen: The phone code

Nearby Connections does not require the user's consent. However, the location permission must be granted in order for discovery with Nearby Connections to work its magic. (It uses BLE scanning under the covers.)

After opening the app on the phone, start by prompting the user for location permission if not already granted on devices running Marshmallow and higher.

Once the permission is granted, start discovering, confirm the connection, collect the credentials, and send a message to the TV app.

Discovering is as simple as advertising. You need a service id (typically the package name -- this should be the same on the Discoverer and Advertiser for them to see each other), a name, and a `EndpointDiscoveryCallback`. Similar to the TV code, the flow is triggered by callbacks based on the connection status.

Nearby.getConnectionsClient(context).startDiscovery(
        context.packageName,
        mobileEndpointDiscoveryCallback,
        DiscoveryOptions.Builder().setStrategy(Strategy.P2P_CLUSTER).build()
        )
        .addOnSuccessListener {
            // We're discovering!
            Log.d(TAG, "We are discovering!")
        }
         .addOnFailureListener {
            // We were unable to start discovering.
            Log.d(TAG, "We cannot start discovering!")
        }

The Discoverer's listeners are similar to the Advertiser's success and failure listeners; they signal if the request to start discovery was successful or not.

Once you discover an advertiser, the `EndpointDiscoveryCallback` is triggered. You need to keep track of the other endpoint to know who to send the payload, e.g.: the user's credentials, to later.

val mobileEndpointDiscoveryCallback = object : EndpointDiscoveryCallback() {
    override fun onEndpointFound(
        endpointId: String, 
        discoveredEndpointInfo: DiscoveredEndpointInfo
    ) {
        // An endpoint was found!
        Log.d(TAG, "An endpoint was found, ${discoveredEndpointInfo.endpointName}")
        Nearby.getConnectionsClient(context)
            .requestConnection(
                context.getString(R.string.phone_name), 
                endpointId, 
                connectionLifecycleCallback)
    }

    override fun onEndpointLost(endpointId: String) {
        // A previously discovered endpoint has gone away.
        Log.d(TAG, "An endpoint was lost, $endpointId")
    }
}

One of the devices must initiate the connection. Since the Discoverer has a callback for endpoint discovery, it makes sense for the phone to request the connection to the TV.

The phone asks for a connection supplying a `connectionLifecycleCallback` which is symmetric to the callback in the TV code.

val connectionLifecycleCallback = object : ConnectionLifecycleCallback() {
    override fun onConnectionInitiated(
        endpointId: String,
        connectionInfo: ConnectionInfo
    ) {
        Log.d(TAG, "Connection initialized to endpoint: $endpointId")
        // Make sure to authenticate using `connectionInfo.authenticationToken` before accepting
        Nearby.getConnectionsClient(context)
                .acceptConnection(endpointId, payloadCallback)
    }

    override fun onConnectionResult(
        endpointId: String,
        connectionResolution: ConnectionResolution
    ) {
        Log.d(TAG, "Connection result from endpoint: $endpointId")
        when (connectionResolution.status.statusCode) {
            ConnectionsStatusCodes.STATUS_OK -> {
                Log.d(TAG, "Connected to endpoint: $endpointId")
                otherDeviceEndpointId = endpointId
                waitingIndicator.visibility = View.GONE
                emailInput.editText?.isEnabled = true
                passwordInput.editText?.isEnabled = true

                Nearby.getConnectionsClient(this).stopDiscovery()
            }
            else -> {
                otherDeviceEndpointId = null
            }
        }
    }

    override fun onDisconnected(endpointId: String) {
        Log.d(TAG, "Disconnected from endpoint: $endpointId")
        otherDeviceEndpointId = null
    }
}

Once the connection is established, stop discovery to avoid keeping this battery-intensive operation running longer than needed. The example stops discovery after the connection is established, but it is possible for a user to leave the activity before that happens. Be sure to stop the discovery/advertising in onStop() on both the TV and phone.


override fun onStop() {
    super.onStop()
    Nearby.getConnectionsClient(this).stopDiscovery()
}


Just like a TV app, when you accept the connection you supply a payload callback. The callback listens for messages from the TV app such as the ACK described above to clean up the connection.

After the devices are connected, the user can use the keyboard and send their authentication information to the TV by calling `sendPayload()`.

fun sendCreditials() {

    val email = emailInput.editText?.text.toString()
    val password = passwordInput.editText?.text.toString()

    val creds = "$email:$password"
    val payload = Payload.fromBytes(creds.toByteArray())
    Log.d(TAG, "sending payload: $creds")
    if (otherDeviceEndpointId != null) {
        Nearby.getConnectionsClient(this)
                .sendPayload(otherDeviceEndpointId, payload)
    }
}

Ending the conversation

After the phone sends the payload to the TV (and the login is successful), there is no reason for the devices to remain connected. The TV can initiate the disconnection with a simple shutdown protocol.

The TV should send an ACK to the phone after it receives the credential payload.

val payloadCallback = object : PayloadCallback() {
    override fun onPayloadReceived(endpointId: String, payload: Payload) {
        if (payload.type == Payload.Type.BYTES) {
            payload.asBytes()?.let {
                val body = String(it)
                Log.d(TAG, "A payload was received: $body")
                // Validate that this payload contains the login credentials, and process them.

                val ack = Payload.fromBytes(ACK_PAYLOAD.toByteArray())
                Nearby.getConnectionsClient(context).sendPayload(endpointId, ack)
            }
        }
    }

    override fun onPayloadTransferUpdate(
        endpointId: String,
        update: PayloadTransferUpdate
    ) {    }
}

The phone should have a `PayloadCallback` that initiates a disconnection in response to the ACK. This is also a good time to reset the UI to show an authenticated state.

private val payloadCallback = object : PayloadCallback() {
    override fun onPayloadReceived(endpointId: String, payload: Payload) {
        if (payload.type == Payload.Type.BYTES) {
            payload.asBytes()?.let {
                val body = String(it)
                Log.d(TAG, "A payload was received: $body")

                if (body == ACK_PAYLOAD) {
                    waitingIndicator.visibility = View.VISIBLE
                    waitingIndicator.text = getString(R.string.login_successful)
                    emailInput.editText?.isEnabled = false
                    passwordInput.editText?.isEnabled = false
                    loginButton.isEnabled = false

                    Nearby.getConnectionsClient(this@MainActivity)
                        .disconnectFromEndpoint(endpointId)
                }
            }
        }
    }

    override fun onPayloadTransferUpdate(
        endpointId: String,
        update: PayloadTransferUpdate
    ) {    }
}

Security considerations

For security (especially since we're sending over sensitive information like login credentials), it's strongly recommended that you authenticate the connection by showing a code and having the user confirm that the two devices being connected are the intended ones -- without this, the connection established by Nearby Connection is encrypted but not authenticated, and that's susceptible to Man-In-The-Middle attacks. The documentation goes into greater detail on how to authenticate a connection.

Let the user accept the connection by displaying a confirmation code on both devices.

Does your app offer a second screen experience?

There are many times when a user needs to supply input to a TV app. The Nearby API provides a way to offload the hardships of an onscreen-dpad-driven keyboard to an easy and familiar phone keyboard.

What use cases do you have where a second screen would simplify your user's life? Leave a comment or send me (@benjamintravels) or Varun (@varunkapoor, Team Lead for Nearby Connections) a tweet to continue the discussion.


Streamlining the developer experience for instant games

$
0
0
Posted by Vlad Zavidovych, Software Engineer; Artem Yudin, Software Engineer

Google Play Instant enables people to experience your game or app natively without having to go through a full installation process. Removing the friction of installing is a great way to increase engagement, conversions, and lifetime value of your users.

Today, we've made it easier to build instant games and apps by removing the URL requirement. Previously, in order to publish an instant game you had to create a web destination for it. The website also had to be connected to the instant game through intent filters and digital asset links verification.

Now, it is no longer required to add URL-based intent filters to your instant game. People will be able to access the instant experience through a 'Try Now' button in the Play Store or Play Games apps, via deep link API, and in the future through the app ads.

While being particularly helpful for games which often don't have a corresponding website, the new URL-less functionality is available to both game and app developers.

How to develop and publish an instant game without adding URL support

Game developers using Unity or the latest Cocos Creator can take advantage of URL-less instant games by simply leaving the URL fields blank in the setup process.

However, if you have your own game engine or have built your game from scratch in C++, check the AndroidManifest to make sure it has the following intent filter declaration:

<intent-filter>
   <action android:name="android.intent.action.MAIN" />
   <category android:name="android.intent.category.LAUNCHER" />
</intent-filter>

Starting with Android Studio 3.2, you can create a new instant game, or convert your existing game, without associating a URL with it. In fact, this is now the default behavior. Here is a run through the process:

  1. First, make sure you're running Android Studio 3.2 or newer by either updating or downloading it here. Make sure to install Instant Apps Development SDK 1.3.0 or higher from Android SDK Manager.
  2. Then download a sample instant app from GitHub. In Android Studio, click File → New → Import Project… and import the downloaded "urlless" sample.
  3. Lastly, after gradle tasks are finished, click the green "Run" button with "instantapp" configuration.

You should see an instant game on your attached device. Instant runtime found and launched the entry point activity in your game with the ACTION_MAIN and CATEGORY_LAUNCHER intent filter.

Once you are ready to publish the sample instant game:

  1. Give your sample game a unique applicationId in app/build.gradle file by replacing existing applicationId - we don't want different applications with the same id.
  2. Generate signed APKs for both installable and instant version of our sample game.
    • In Android Studio, Build → Generate Signed Bundle / APK…
    • Choose APK for both "app" and "instantapp" modules.
  3. In the Play Console, create a new application, upload APK under "App Releases" tab, and then upload "instantapp-release.zip" under "Android Instant Apps" tab.
    • The installable app must be rolled out before the instant one.
  4. The rollout process may be familiar to most Android developers, but here's a step-by-step guide in case you run into any issues.

Once you publish your instant game, people can access it via a 'Try Now' button in Play Store within 24 hours or sooner. You can also send traffic to your instant game using the deep link API:

market://details?id=MY.PACKAGE.NAME&launch=true&referrer=myreferrer

MY.PACKAGE.NAME refers to applicationId that you have replaced in app/build.gradle file.

What's next?

With the launch of Android App Bundle we are excited to further simplify the developer experience for Google Play Instant. In the coming months we are making it possible to deliver your app's or game's dynamic features instantly from the same bundle as your installable app or game. Stay tuned!

Check out more information on Google Play Instant, or feel free to ask a question on Stack Overflow, or report an issue to our public tracker.

How useful did you find this blogpost?

Introducing the new Google Fit

$
0
0

There’s a lot of talk out there about how to stay active and healthy: “get your steps in,” “sitting is the new smoking,” “no pain, no gain.” It can feel overwhelming. So we’ve worked with the American Heart Association (AHA) and the World Health Organization (WHO) to understand the science behind physical activity and help you get the amount and intensity needed to improve your health.

Activity goals to improve your health

The new Google Fit is centered around two simple and smart activity goals based on AHA and WHO’s activity recommendations shown to impact health: Move Minutes and Heart Points.

When it comes to your health, it’s important to move more and sit less. Earn Move Minutes for all of your activity and get motivated to make small, healthy changes throughout your day, like taking the stairs instead of the elevator, or catching up with a friend over a walk instead of a coffee.

Activities that get your heart pumping harder result in even greater health benefits. Heart Points give you credit for these activities. You’ll score one point for each minute of moderate activity, like picking up the pace while walking your dog, and double points for more intense activities like running or kickboxing. It takes just 30 minutes of brisk walking 5 days a week to reach the AHA and WHO’s recommended amount of physical activity, which is shown to reduce the risk of heart disease, improve sleep, and increase overall mental well-being.

However you move, make it count

When you’re walking, running or biking throughout the day, Google Fit will automatically detect these activities using your phone or watch sensors—like the accelerometer and GPS—to estimate the number of Heart Points you earn. If you’re into a different type of exercise, you can choose other activities like gardening, pilates, rowing or spinning, and Google Fit will calculate the Heart Points and Move Minutes achieved during your workout. Google Fit also integrates with other fitness apps like Strava, Runkeeper, Endomondo and MyFitnessPal, so you get credit for every Move Minute and Heart Point you earn. You’ll get tips and help to adjust your goals over time based on your activity. Your journal will show your activities, achievements and goal progress across all of your apps.

If you already use Google Fit on Android phone or Wear OS by Google watch, you’ll see these changes on your phone or smartwatch beginning this week. If you’re new to Google Fit, learn more at google.com/fit and join us on our way to a healthier and more active life. 

Source: Android


Evolution of Android Security Updates

$
0
0

Posted by Dave Kleidermacher, VP, Head of Security - Android, Chrome OS, Play

At Google I/O 2018, in our What's New in Android Security session, we shared a brief update on the Android security updates program. With the official release of Android 9 Pie, we wanted to share a more comprehensive update on the state of security updates, including best practice guidance for manufacturers, how we're making Android easier to update, and how we're ensuring compliance to Android security update releases.

Commercial Best Practices around Android Security Updates

As we noted in our 2017 Android Security Year-in-Review, Android's anti-exploitation strength now leads the mobile industry and has made it exceedingly difficult and expensive to leverage operating system bugs into compromises. Nevertheless, an important defense-in-depth strategy is to ensure critical security updates are delivered in a timely manner. Monthly security updates are the recommended best practice for Android smartphones. We deliver monthly Android source code patches to smartphone manufacturers so they may incorporate those patches into firmware updates. We also deliver firmware updates over-the-air to Pixel devices on a reliable monthly cadence and offer the free use of Google's firmware over-the-air (FOTA) servers to manufacturers. Monthly security updates are also required for devices covered under the Android One program.

While monthly security updates are best, at minimum, Android manufacturers should deliver regular security updates in advance of coordinated disclosure of high severity vulnerabilities, published in our Android bulletins. Since the common vulnerability disclosure window is 90 days, updates on a 90-day frequency represents a minimum security hygiene requirement.

Enterprise Best Practices

Product security factors into purchase decisions of enterprises, who often consider device security update cadence, flexibility of policy controls, and authentication features. Earlier this year, we introduced the Android Enterprise Recommended program to help businesses make these decisions. To be listed, Android devices must satisfy numerous requirements, including regular security updates: at least every 90 days, with monthly updates strongly recommended. In addition to businesses, consumers interested in understanding security update practices and commitment may also refer to the Enterprise Recommended list.

Making Android Easier to Update

We've also been working to make Android easier to update, overall. A key pillar of that strategy is to improve modularity and clarity of interfaces, enabling operating system subsystems to be updated without adversely impacting others. Project Treble is one example of this strategy in action and has enabled devices to update to Android P more easily and efficiently than was possible in previous releases. The modularity strategy applies equally well for security updates, as a framework security update can be performed independently of device specific components.

Another part of the strategy involves the extraction of operating system services into user-mode applications that can be updated independently, and sometimes more rapidly, than the base operating system. For example, Google Play services, including secure networking components, and the Chrome browser can be updated individually, just like other Google Play apps.

Partner programs are a third key pillar of the updateability strategy. One example is the GMS Express program, in which Google is working closely with system-on-chip (SoC) suppliers to provide monthly pre-integrated and pre-tested Android security updates for SoC reference designs, reducing cost and time to market for delivering them to users.

Security Patch Level Compliance

Recently, researchers reported a handful of missing security bug fixes across some Android devices. Initial reports had several inaccuracies, which have since been corrected. We have been developing security update testing systems that are now making compliance failures less likely to occur. In particular, we recently delivered a new testing infrastructure that enables manufacturers to develop and deploy automated tests across lower levels of the firmware stack that were previously relegated to manual testing. In addition, the Android build approval process now includes scanning of device images for specific patterns, reducing the risk of omission.

Looking Forward

In 2017, about a billion Android devices received security updates, representing approximately 30% growth over the preceding year. We continue to work hard devising thoughtful strategies to make Android easier to update by introducing improved processes and programs for the ecosystem. In addition, we are also working to drive increased and more expedient partner adoption of our security update and compliance requirements. As a result, over coming quarters, we expect the largest ever growth in the number of Android devices receiving regular security updates.

Bugs are inevitable in all complex software systems, but exploitability of those bugs is not. We're working hard to ensure that the incidence of potentially harmful exploitation of bugs continues to decline, such that the frequency for security updates will reduce, not increase, over time. While monthly security updates represents today's best practice, we see a future in which security updates becomes easier and rarer, while maintaining the same goal to protect all users across all devices.

Exclusive new organic acquisition insights on the Google Play Console

$
0
0

Posted by Tom Grinsted, Product Manager, Google Play

We've updated the Play Console acquisition reports to give new insights into what users do on the Play Store to discover your app. It's a great way to super-charge your App Store Optimization (ASO) and onboarding experience.

One of the things every developer wants to know is how people discover their app or game. User acquisition reports in the Google Play Console are a great way to understand this. For many apps and games, a stand-out source is Organic traffic — it's usually the largest or second largest source of store listing visits and installs.

Organic traffic is made up of people who come to your store listing while exporting or searching the Play Store. These visitors might find your app in a seasonal collection, from featuring, or while searching for a specific use case or term.

Until recently, this traffic has been bundled together with no breakdown of data into user behavior. With our latest updates we have changed this by introducing new and exclusive acquisition insights to the Google Play Console. These enable you to understand what people in the Play Store do to discover your app or game. They reveal how many people discover your app through exploring the store, and how many search to find your app, and even the search terms they use!

App Store Optimization (ASO) is vital to driving your organic traffic and this update enables you to do this with more data and better understanding.

A new data breakdown

When you visit the user acquisition report, the first change you'll notice is that organic traffic is broken down. This breakdown means you can see how people arrive at your store listing by searching or exploring (actions that aren't search like browsing the homepage, visiting a category list, or viewing related apps).

This change has been of immediate benefit to developers, enabling their growth teams to optimize acquisition strategies. For example, Scopely found that:

"Isolating [explore] from search and then a deeper dive into search gives the whole organic picture. It allows us to focus on acquisition areas that really matter." Dorothee Pinlet, VP Partnerships, Scopely


Click through for more insights

From the new search row, you can click-through to see the aggregate number of people using different search terms to find your store listing, and which of those lead to the most installs. This breakdown is a view into the Play Store that has not been available before.

Our pilot partners, who helped us refine the feature ahead of launch, were very happy with how this data has helped them make more informed decisions.

For example, at Fun games for free:

"We were impressed by the relevance of the long tail searches."
Guilherme Major, Head of Organic Distribution and Business Development, Fun Games for Free

While Evernote found that the breakdown:

"... offers surprising and actionable insights about the effectiveness of search terms in driving installs and retained users."
May Allen, Product Manager, Evernote

Some partners changed their in-app onboarding experience to highlight features that reflected the search terms that were driving installs, to better meet user expectations. While others evaluated if their influencer marketing was having an impact by looking for their advocates' names in the search results after adding them to descriptions.

Better coverage

The new organic data also includes information about when people visiting the Play Store saw previews of your listings, not just when they visited your full page. People see these previews when they make certain searches, such as searching directly for a brand or app name. As well as more generally in some markets. This new information gives you more visibility into where people see your assets. It helps you decide how to optimize these assets, for instance by ensuring that your screenshots are impactful. And when you come to do that, you've got Store Listing Experiments.

This change means that your total reported visits and installs are likely to increase as of July 30, 2018. This increase is because previews will be counted as listing views, previously they were included in the category "Installs without store listing visits".

Putting the data to work

The developers who had the opportunity to test Organic breakdowns have given feedback that they loved them. They've also been kind enough to share some insights into how they plan to use the data. Perhaps these thoughts on how to use the data will spark some ideas for your business.

Some developers will be using this new data to evaluate their acquisition strategies by looking at the breakdown between explore and search. They will use this breakdown to evaluate the impact of exploring behaviors, especially around times when the app has been featured on the Play Store.

Using the information about popular search terms, several developers plan to change their app or game's Google Play listing to reflect user interests better. This change involves adjusting the descriptions and screenshots to tie more directly into the top search terms.

Others plan to use the insight provided by search term information to optimize their in-app onboarding. Here they plan to make sure that the onboarding talks about the features related to the most popular searches people made when discovering their app or game, highlighting and reinforcing the benefits.

Final word

Our team is always thinking about the tools we can build to help you optimize the discovery and installation of your app or game from the Play Store. Organic breakdowns is just one of these tools, a new way to help drive your success. Ultimately, your success is what we work towards. Organic breakdowns give you a more comprehensive picture of how people discover you on the Play Store so you can optimize your store presence, turning more visits into installs, and more installs into engaged users.

How useful did you find this blog post?

Verifying your Google Assistant media action integrations on Android

$
0
0
Posted by Nevin Mital, Partner Developer Relations

The Media Controller Test (MCT) app is a powerful tool that allows you to test the intricacies of media playback on Android, and it's just gotten even more useful. Media experiences including voice interactions via the Google Assistant on Android phones, cars, TVs, and headphones, are powered by Android MediaSession APIs. This tool will help you verify your integrations. We've now added a new verification testing framework that can be used to help automate your QA testing.

The MCT is meant to be used in conjunction with an app that implements media APIs, such as the Universal Android Music Player. The MCT surfaces information about the media app's MediaController, such as the PlaybackState and Metadata, and can be used to test inter-app media controls.

The Media Action Lifecycle can be complex to follow; even in a simple Play From Search request, there are many intermediate steps (simplified timeline depicted below) where something could go wrong. The MCT can be used to help highlight any inconsistencies in how your music app handles MediaController TransportControl requests.

Timeline of the interaction between the User, the Google Assistant, and the third party Android App for a Play From Search request.

Previously, using the MCT required a lot of manual interaction and monitoring. The new verification testing framework offers one-click tests that you can run to ensure that your media app responds correctly to a playback request.

Running a verification test

To access the new verification tests in the MCT, click the Test button next to your desired media app.

MCT Screenshot of launch screen; contains a list of installed media apps, with an option to go to either the Control or Test view for each.

The next screen shows you detailed information about the MediaController, for example the PlaybackState, Metadata, and Queue. There are two buttons on the toolbar in the top right: the button on the left toggles between parsable and formatted logs, and the button on the right refreshes this view to display the most current information.

MCT Screenshot of the left screen in the Testing view for UAMP; contains information about the Media Controller's Playback State, Metadata, Repeat Mode, Shuffle Mode, and Queue.

By swiping to the left, you arrive at the verification tests view, where you can see a scrollable list of defined tests, a text field to enter a query for tests that require one, and a section to display the results of the test.

MCT Screenshot of the right screen in the Testing view for UAMP; contains a list of tests, a query text field, and a results display section.

As an example, to run the Play From Search Test, you can enter a search query into the text field then hit the Run Test button. Looks like the test succeeded!

MCT Screenshot of the right screen in the Testing view for UAMP; the Play From Search test was run with the query 'Memories' and ended successfully.

Below are examples of the Pause Test (left) and Seek To test (right).

MCT Screenshot of the right screen in the Testing view for UAMP; a Pause test was run successfully. MCT Screenshot of the right screen in the Testing view for UAMP; a Seek To test was run successfully.

Android TV

The MCT now also works on Android TV! For your media app to work with the Android TV version of the MCT, your media app must have a MediaBrowserService implementation. Please see here for more details on how to do this.

On launching the MCT on Android TV, you will see a list of installed media apps. Note that an app will only appear in this list if it implements the MediaBrowserService.

Android TV MCT Screenshot of the launch screen; contains a list of installed media apps that implement the MediaBrowserService.

Selecting an app will take you to the testing screen, which will display a list of verification tests on the right.

Android TV MCT Screenshot of the testing screen; contains a list of tests on the right side.

Running a test will populate the left side of the screen with selected MediaController information. For more details, please check the MCT logs in Logcat.

Android TV MCT Screenshot of the testing screen; the Pause test was run successfully and the left side of the screen now displays selected MediaController information.

Tests that require a query are marked with a keyboard icon. Clicking on one of these tests will open an input field for the query. Upon hitting Enter, the test will run.

Android TV MCT Screenshot of the testing screen; clicking on the Seek To test opened an input field for the query.

To make text input easier, you can also use the ADB command:

adb shell input text [query]

Note that '%s' will add a space between words. For example, the command adb shell input text hello%sworld will add the text "hello world" to the input field.

What's next

The MCT currently includes simple single-media-action tests for the following requests:

  • Play
  • Play From Search
  • Play From Media ID
  • Play From URI
  • Pause
  • Stop
  • Skip To Next
  • Skip To Previous
  • Skip To Queue Item
  • Seek To

For a technical deep dive on how the tests are structured and how to add more tests, visit the MCT GitHub Wiki. We'd love for you to submit pull requests with more tests that you think are useful to have and for any bug fixes. Please make sure to review the contributions process for more information.

Check out the latest updates on GitHub!

Make the most of Notifications with the redesigned Wear OS by Google

$
0
0

Posted by Hoi Lam, Lead Developer Advocate, Wear OS by Google

Today we announced that we are evolving the design of Wear OS by Google to help you get the most out of your time - providing quicker access to your information and notifications. Notifications can come from the automatic bridging of the phone's notification or be generated by a local Wear app running on the watch. Whether you are a phone developer, a Wear app developer, or both, there are a few things you will need to know about the new notification stream.

The new notification stream

Until now, each notification took up the entire screen in Wear OS. Although this provided more space to include things like inline action, it also meant it took a long time for the user to go through all their notifications. The new notification stream is more compact, and can display multiple notifications on the same screen. This means users can process their notification streams more quickly.

What this means for developers

  • Concise notification content is even more important. The new unexpanded notification on Wear will show up to three lines of text. Because this is already more information than a single line unexpanded notification on the user's phone, if your notification works on the phone unexpanded, it should be fine on Wear.
  • Brand notification with color. The default title and icon color for notification is white. Developers can now convey their brand identities by customizing the color of the title and icon tint using setColor.
  • Custom notification layout will no longer be supported. Previously developers used setDisplayIntent to inflate a custom activity inside the notification stream. We have found that the custom layout often does not take into account of the device form factor, and is difficult to keep up to date as Wear OS's notification experience evolves. As a result, we will no longer support this in notifications.
  • Inline action is being reviewed. To save space, the new layout no longer display inline action in the stream and setHintDisplayActionInline will be ignored. Users can continue to access notification actions including inline action when they tap to expand the notification. Our design team is reviewing whether we should include inline action in a future release. As a result, before a decision is made, we are not deprecating the related APIs. We will keep the developer community updated in due course.

As always, the current best practices for notification still apply. In particular, for messaging apps developers, we strongly encourage the use of MessagingStyle notification and enabling on-device Smart Reply through setAllowGeneratedReplies.

We will start rolling these changes out in the next month, so watch for updates on your Wear OS by Google smartwatch!

Staged releases allow you to bring new features to your users quickly, safely and regularly.

$
0
0

Posted by Peter Armitage, Software Engineer, Google Play

Releasing a new version of your app is an exciting moment when your team's hard work finally gets into the hands of your users. However, releasing can also be challenging - you want to keep your existing users happy without introducing performance regressions or bugs. At Google I/O this year, we talked about staged releases as an essential part of how Google does app releases, allowing you to manage the inherent risks of a new release by making a new version of your app available to just a fraction of your users. You can then increase this fraction as you gain confidence that your new version works as expected. We are excited that starting today staged releases will be possible on testing tracks, as well as the production track.

We will take a closer look at how staged releases work, and how you can use them as part of your release process.

Advantages of a staged release

The first benefit of a staged release is that it only exposes a fraction of your users to the new version. If the new version contains a bug, only a small number of people will be inconvenienced by it. This is much safer than releasing a new version to all of your users at once.

Another benefit is that if you discover a bug, you can halt the rollout, preventing any new users from downloading that version. Instead, they will receive the previous version.

These capabilities should relieve a lot of the uncertainty of rolling out a new version. And that will allow you to do it more often. We encourage releasing versions of a server more often because it reduces the number of changes between each release, allowing you to more easily test and troubleshoot. The same principle applies to apps, though there will be a delay before most of your users upgrade to the latest version.

Staged releases as part of your normal release process

Let's look at a typical release process for an app with 100,000 users.

  1. Every Monday the developer builds a new version of the app from the latest version of the code that passes the automatic tests. They push the new release to Google Play's internal test track, and their QA team immediately starts testing it manually. Any bugs they find can be fixed and a new version can be built and pushed for them to re-check.
  2. On Tuesday, if the QA team have approved the latest release, it can be promoted to the app's alpha track. All the employees at the company have opted in to testing. Once the new release is pushed to the alpha track, the employees can download the new version. They can do this manually, or they may have auto-updates enabled, in which case they will probably update within a few hours.
  3. On Wednesday, if there are no reported issues with the release, they can promote the release to the production track and start a rollout at 10%. This means 10,000 users will have the opportunity to upgrade. Some will upgrade immediately, others will wait. The 10% of users that receive the app first are randomly selected, and the users will be randomly chosen each week.
  4. On Thursday, the developer checks the Play Console to see their crash reports, Android vitals, and feedback. If these all look good they can increase the rollout to 100%. All users will be able to upgrade to the new version.
  5. On Friday, the developer doesn't change anything, to ensure a stress-free weekend!

For big apps and small apps

Some apps are just starting out, and although there's no QA team, it's still worth testing the app on a few different devices before releasing it. Instead of having a track for employees, the developer has added their friends and family, who can contact them if they see an issue.

When an app gets larger and uses the open testing track, it may have 5,000 testers. These testers won't give public feedback on the Play store, but will be able to give feedback to the developer directly. If this app has 1 million users, they may first release to 1%, before going to 10%, then 100%.

Once an app becomes very popular, it could have over 100,000 testers. In that case the developer is now able to do a staged release on their testing track.

How to bounce back from issues

Bugs happen, and if you discover a problem with your new version you may want to halt the release. This will stop users from getting the new version, either by upgrading or installing for the first time. However, those who have already got the new version will not downgrade.

If the issue was not in the app itself, but on a server that the app communicates with, it may be best to fix the issue in the server, then resume the release. Resuming it allows some fraction of your users to access the new version again. This is the same set of users that were able to download the release before it was halted.

If the issue was in the app, you will have to fix it and release a new version. Or alternatively, you may choose to rebuild the previous version with a higher version code. Then you can start a staged release to the same set of users that the previous release went to.

API support

Staged releases are supported in v3 of the Play Console API on all tracks. Mark a release as "inProgress" and set a fraction of the population to target. For instance, to start a staged release to 5%:

{
  "releases": [{
      "versionCodes": ["99"],
      "userFraction": 0.05,
      "status": "inProgress"
  }]
}

Alternatively, if you release using the UI, it will suggest a fraction.

What next?

We hope you find these features useful and take advantage of them for successful updates with Google Play. If you're interested in some of the other great tools for distributing your apps, check out the I/O 2018 sessions, and learn more about test tracks and staged updates.

How useful did you find this blogpost?


Making it easier to set up Android devices as company-owned

$
0
0
When employees set up their phones and tablets as company-owned devices, they give your organization full control over those devices—allowing you to apply policies regarding app installation, network settings, security options, and more. This helps protect your users and your corporate data.

If you have advanced mobile device management but don’t register your company-owned devices in the Admin console, your users must choose to set up their devices as company-owned.

To encourage more users to make this choice, we’ll start showing the screen below to all users who add their G Suite account to a new Android device before adding their personal account.

This change will start rolling out on September 19th, 2018; please note that it may take several weeks for it to take effect for all users.


Starting on September 19th, users will be asked if they own the device they’re setting up. Unless they explicitly state that they own the device personally, ownership will be auto-assigned to your organization.

Currently, your users only see this choice if your organization has Device Owner mode enabled. That option will disappear from the Admin console on September 19th.

Note that users will only see the screen and option above on new (and recently factory-reset) devices running Android 6.0 or higher.

Allowing users to install any app from the managed Google Play store

In addition to the change outlined above, we’re making it easier to install apps on company-owned Android devices and work profiles.

Currently, you have to actively whitelist apps to make them available to your users. Starting on September 19th, users with company-owned Android devices and work profiles will be allowed to install any app from the managed Google Play store by default. If you don’t want your users to do this, you can choose to restrict app availability to whitelisted apps.

Launch Details
Release track:
Launching to both Rapid Release and Scheduled Release on September 19th, 2018

Editions:
Available to all G Suite and Cloud Identity Premium editions

Rollout pace:
Extended rollout (potentially longer than 15 days for feature visibility)

Impact:
All end users

Action:
Change management suggested/FYI

More Information
Help Center: Set up Android devices your company owns


Launch release calendar
Launch detail categories
Get these product update alerts by email
Subscribe to the RSS feed of these updates

Moar Power in Android 9 Pie and the future

$
0
0

Posted by Madan Ankapura, Product Manager, Android

This is the first in a series of blog posts that outline strategies and guidance in Android with regard to power.

Your users care a lot about battery -- if it runs out too quickly, it means they can't use your apps. Being a good steward of battery power is an important part of your relationship with the user, and we're continuing to add features to the platform that can help you accomplish this.

As part of our announced Play policy about improving app security and performance, an app's target API level must be no more than one year older than the current Android release. Keeping the target API level current will ensure that apps can take advantage of security and performance enhancements offered in the latest platform releases. When you update your app's target API level, it's important that you evaluate your background and foreground needs, which could have a significant impact on power & performance.

Past releases of Android included a number of features that helped manage battery life better, like:

  • Job Scheduler in Android 5.0 Lollipop, which allows deferring work
  • Doze and App Standby in Android 6.0 Marshmallow, which disables network access and suspends syncs and background work - when device or apps are unused for a prolonged period.
  • Doze improvements in Android 7.0 Nougat, which applies a subset of Doze restrictions when the screen is off and not stationary.
  • Background limits in Android 8.0 Oreo, which prevent background services and throttle location updates.

In Android 9 Pie, we made further improvements based on these three principles:

  1. Developers want to build cool apps
  2. Apps need to be power-efficient
  3. Users don't want to be bothered to configure app settings

This means that the OS needs to be smarter and adapt to user preferences while improving the battery life of the device. To address these needs, we have introduced App Standby Buckets, Background Restrictions, and improved Battery Saver. Please test your app with these features enabled on a device running Android 9 Pie.

Battery Saver and Doze operate on a device-wide level, while Adaptive Battery (app standby buckets powered by a Deepmind ML model) and background restrictions operate on a per-app basis. The diagram below helps understand when a scheduled work will run.

As you update your apps to target Oreo or above, please review this checklist and follow the below table for background work

Currently Using Porting to Oreo
JobScheduler JobScheduler
Firebase JobDispatcher Firebase JobDispatcher
Background Service Jobscheduler
Foreground Service Foreground Service with action to STOP service

Note: when the WorkManager API becomes stable, we will be recommending WorkManager for most of these use cases

We recommend the following strategy given the importance for app developers to invest in the right design patterns and architecture:

  1. Do the needed work when the user is actively using the app
  2. Make any work/task that is done in the background deferrable
  3. Use foreground services but provide an action in the notification so user can stop the foreground service

Similarly, other OS primitives like alarms, network, and FCM messages also have constraints that are described in the developer documentation on power-management restrictions. You can learn more about each of these features via Google I/O presentation, DevByte and additional power optimization developer documentation.

We will be publishing a series of design pattern guidances in the upcoming weeks. Stay tuned.

Acknowledgements: This series of blog posts is in joint collaboration with Android Framework and DevRel teams.

Notifying your users with FCM

$
0
0

Posted by Jingyu Shi, Developer Advocate, Partner Devrel

This is the second in a series of blog posts in which outline strategies and guidance in Android with regard to power.

Notifications are a powerful channel you can use to keep your app's users connected and updated. Android provides Notification APIs to create and post notifications on the device, but quite often these notifications are triggered by external events and sent to your app from your app server.

In this blog post, we'll explain when and how to generate these remote notifications to provide timely updates to users and minimize battery drain.

Use FCM for remote notifications

We recommend using Firebase Cloud Messaging (FCM) to send remote notifications to Android devices. FCM is a free, cross-platform messaging solution that reliably delivers hundreds of billions of messages per day. It is primarily used to send remote notifications and to notify client applications that data is available to sync. If you still use Google Cloud Messaging (GCM) or the C2DM library , both of which are deprecated, it's time to upgrade to FCM!

There are two types of FCM messages you can choose from:

  • Notification Messages, which simplify notification handling and are high priority by default.
  • Data Messages, for when you want to handle the FCM messages within the client app.

You can set the priority to either high or normal on the data messages. You can find out more about FCM messages and message handling in this blog post on Firebase Blog.

FCM is optimized to work with Android power management features. Using the appropriate message priority and type helps you reach your users in a timely manner, and also helps save their battery. Learn more about power management features in this blog post: "Moar Power in P and the future".

To notify or not?

All of the notifications that you send should be well-structured and actionable, as well as provide timely and relevant information to your users. We recommend that you follow these notification guidelines, and avoid spamming your users. No one wants to be distracted by irrelevant or poorly-structured notifications. If your app behaves like this, your users may block the notifications or even uninstall your app.

The When not to use a notification section of the Material Design documentation for notifications highlights cases where you should not send your user a notification. For example, a common use case for a normal priority FCM Data Message is to tell the app when there's content ready for sync, which requires no user interaction. The sync should happen quietly in the background, with no need for a notification, and you can use the WorkManager1 or JobScheduler API to schedule the sync.

Post a notification first

If you are sending remote notifications, you should always post the notification as soon as possible upon receiving the FCM message. Adding any additional network requests before posting a notification will lead to delayed notifications for some of your users. When not handled properly, the notifications might not be seen at all, see the "avoid background service" section below.


⚠ Avoid adding any additional network requests before posting a notification

Also keep in mind that, depending on the state of the device, user actions, and app behavior, one or many power saving features could be restricting your app's background work. As a result, your app's jobs and alarms might be delayed, and its ability to access the network might be restricted.

For all of these reasons, to ensure timely delivery of the notification, you should always show the notification promptly when the FCM message is received, before any other work like network fetch or scheduling jobs.

FCM message payload is your friend

To post a notification upon the receipt of an FCM message, you should include all the data needed for the notification in the FCM message payload.

The same applies to data sync--we recommend that your app send as much data as possible in the FCM payload and, if needed, load the remainder of the data when the app opens. On a well-performing network, there's a good chance that the data will be synced by the time the user opens the app so the spinner won't be shown to the user. If network connectivity is not good, a notification will be sent to the user with the content in the FCM payload to inform the user in a timely manner. The user can then open the app to load all the data.

You can also encrypt FCM messages end-to-end using libraries like Capillary. The image below shows a general flow of how to handle FCM messages.

Need more data?

As convenient as FCM message payload is, it comes with a 4KB maximum limit. If you need to send a rich notification with an image attachment, or you want to improve your user experience by keeping your app in sync with media content, you may need more than the 4KB payload limit. For this, we recommend using FCM messages in combination with the WorkManager 1 or JobScheduler API.

If you need to post a rich notification, we recommend posting the notification first, with some of the content in the FCM message. Then schedule a job to fetch the remainder of the content. Once the job is finished, update the notification if it is still active. For example, you can include a thumbnail or preview of the content in the FCM payload and post it in the notification first. Then schedule a job to fetch the rest of the media files. Be aware that if you've scheduled jobs from the FCM message handler, it is possible that when the user launches the app, the scheduled job won't have finished yet. You should handle this case gracefully.

In short, use the data in the FCM message payload to post a notification and keep your app content updated first. If you still need more data, then schedule jobs with APIs like WorkManager 1 or JobScheduler API.

Avoid background services

One common pitfall is using a background service to fetch data in the FCM message handler, since background service will be stopped by the system per recent changes to Google Play Policy (Starting late 2018, Google Play will require a minimum target API level ).

Android 9 Pie will also impose background execution limits when battery saver is on. Starting a background service will lead to IllegalStateException from a normal priority FCM message. High priority messages do grant you a short whitelist window that allows you to start a background service. However, starting a background service with a network call will put the service at risk of getting terminated by the system, because the short execution window is only intended to be used for posting a notification.

You should avoid using background services but use WorkManager 1 or JobScheduler API instead to perform operations in the background.

Power & message priority

Android 6 Marshmallow introduced Doze. FCM is optimized to work with Doze, and you can use high priority FCM messages to notify your users immediately. In Doze mode, normal priority messages are deferred to a maintenance window. This enables the system to save battery when a device is idle, but still ensure users receive time-critical notifications. Consider an instant messaging app that sends users messages from friends or incoming phone calls or a home monitoring app sends users alarm notifications. These are some of the acceptable examples where you can use high priority FCM messages.

In addition, Android 9 Pie introduced App Standby Buckets and App Restrictions.

The table below shows how various power-management features affect message delivery behaviors.

High priority message delivery Normal priority message delivery
App in Foreground Immediate, unless app is restricted (see below) Immediate, unless app is restricted (see below)
App in Background
Device in Doze (M+) and Doze "on the go" (N+) Immediate Deferred until maintenance window
App Standby Buckets (P+) May be restricted No restriction
App Restrictions (P+) All messages dropped (see below) All messages dropped (see below)
Battery Saver No restriction No restriction


★ Note: Starting January 2019, App Restrictions (in Battery Setting) will include restrictions on FCM messages. You can find out if your app is in the restricted state with the isBackgroundRestricted API. Once your app is in the restricted state, no FCM messages will be delivered to the app at all. This will apply to both high and normal priority FCM messages and when app is in either foreground or background.

App Standby Buckets impose different levels of restrictions based on the app's standby bucket. Based on which bucket your app belongs to, there might be a cap for the number of high priority messages you are allowed to send per day. Once you reach the cap, any subsequent high priority messages will be downgraded to normal priority. See more details in the power management restrictions.

High priority FCM messages are designed to send remote notifications or trigger actions that involve user interactions. As long as you always use high priority messages for these purposes, your high priority messages will be delivered immediately and remote notifications will be displayed without delay. In addition, when a notification from a high priority message causes a user to open your app, the app gets promoted to the active bucket, which exempts it from FCM caps. The example below shows an instant messaging app moving to the active bucket after the user taps on a notification triggered by a high priority FCM message.

However, if you use high priority messages to send notifications to the blocked notification channels or tasks which do not involve user interactions, you will run the risk of wasting the high priority messages allocated in your app's bucket. Once reaching the cap, you won't be able to send urgent notifications anymore.

In summary, you should only use high priority FCM messages to deliver immediate, time-critical notifications to users. Doing so will ensure these messages and subsequent high priority messages reach your users without getting downgraded. You should use normal priority messages to trigger events that do not require immediate execution, such as a notification that is not time-sensitive or a data sync in the background.

Test with Android 9!

We highly recommend that you test your apps under all of the power management features mentioned above. To learn more about handling FCM messages on Android in your code, visit the Firebase blog.

Thank you for helping move the ecosystem forward, making better Android apps, and saving users' batteries!

Acknowledgements: This blog posts is in joint collaboration with FCM and Android teams.

1 WorkManager is the recommended solution for background processing once it's stable.

Android and Google Play Security Rewards Programs surpass $3M in payouts

$
0
0

Posted by Jason Woloz and Mayank Jain, Android Security & Privacy Team

Our Android and Play security reward programs help us work with top researchers from around the world to improve Android ecosystem security every day. Thank you to all the amazing researchers who submitted vulnerability reports.

Android Security Rewards

In the ASR program's third year, we received over 470 qualifying vulnerability reports from researchers and the average pay per researcher jumped by 23%. To date, the ASR program has rewarded researchers with over $3M, paying out roughly $1M per year.

Here are some of the highlights from the Android Security Rewards program's third year:

  • There were no payouts for our highest possible reward: a complete remote exploit chain leading to TrustZone or Verified Boot compromise.
  • 99 individuals contributed one or more fixes.
  • The ASR program's reward averages were $2,600 per reward and $12,500 per researcher.
  • Guang Gong received our highest reward amount to date: $105,000 for his submission of a remote exploit chain.

As part of our ongoing commitment to security we regularly update our programs and policies based on ecosystem feedback. We also updated our severity guidelines for evaluating the impact of reported security vulnerabilities against the Android platform.

Google Play Security Rewards

In October 2017, we rolled out the Google Play Security Reward Program to encourage security research into popular Android apps available on Google Play. So far, researchers have reported over 30 vulnerabilities through the program, earning a combined bounty amount of over $100K.

If undetected, these vulnerabilities could have potentially led to elevation of privilege, access to sensitive data and remote code execution on devices.

Keeping devices secure

In addition to rewarding for vulnerabilities, we continue to work with the broad and diverse Android ecosystem to protect users from issues reported through our program. We collaborate with manufacturers to ensure that these issues are fixed on their devices through monthly security updates. Over 250 device models have a majority of their deployed devices running a security update from the last 90 days. This table shows the models with a majority of deployed devices running a security update from the last three months:

Manufacturer Device
ANS L50
Asus ZenFone 5Z (ZS620KL/ZS621KL), ZenFone Max Plus M1 (ZB570TL), ZenFone 4 Pro (ZS551KL), ZenFone 5 (ZE620KL), ZenFone Max M1 (ZB555KL), ZenFone 4 (ZE554KL), ZenFone 4 Selfie Pro (ZD552KL), ZenFone 3 (ZE552KL), ZenFone 3 Zoom (ZE553KL), ZenFone 3 (ZE520KL), ZenFone 3 Deluxe (ZS570KL), ZenFone 4 Selfie (ZD553KL), ZenFone Live L1 (ZA550KL), ZenFone 5 Lite (ZC600KL), ZenFone 3s Max (ZC521TL)
BlackBerry BlackBerry MOTION, BlackBerry KEY2
Blu Grand XL LTE, Vivo ONE, R2_3G, Grand_M2, BLU STUDIO J8 LTE
bq Aquaris V Plus, Aquaris V, Aquaris U2 Lite, Aquaris U2, Aquaris X, Aquaris X2, Aquaris X Pro, Aquaris U Plus, Aquaris X5 Plus, Aquaris U lite, Aquaris U
Docomo F-04K, F-05J, F-03H
Essential Products PH-1
Fujitsu F-01K
General Mobile GM8, GM8 Go
Google Pixel 2 XL, Pixel 2, Pixel XL, Pixel
HTC U12+, HTC U11+
Huawei Honor Note10, nova 3, nova 3i, Huawei Nova 3I, 荣耀9i, 华为G9青春版, Honor Play, G9青春版, P20 Pro, Honor V9, huawei nova 2, P20 lite, Honor 10, Honor 8 Pro, Honor 6X, Honor 9, nova 3e, P20, PORSCHE DESIGN HUAWEI Mate RS, FRD-L02, HUAWEI Y9 2018, Huawei Nova 2, Honor View 10, HUAWEI P20 Lite, Mate 9 Pro, Nexus 6P, HUAWEI Y5 2018, Honor V10, Mate 10 Pro, Mate 9, Honor 9, Lite, 荣耀9青春版, nova 2i, HUAWEI nova 2 Plus, P10 lite, nova 青春版本, FIG-LX1, HUAWEI G Elite Plus, HUAWEI Y7 2018, Honor 7S, HUAWEI P smart, P10, Honor 7C, 荣耀8青春版, HUAWEI Y7 Prime 2018, P10 Plus, 荣耀畅玩7X, HUAWEI Y6 2018, Mate 10 lite, Honor 7A, P9 Plus, 华为畅享8, honor 6x, HUAWEI P9 lite mini, HUAWEI GR5 2017, Mate 10
Itel P13
Kyocera X3
Lanix Alpha_950, Ilium X520
Lava Z61, Z50
LGE LG Q7+, LG G7 ThinQ, LG Stylo 4, LG K30, V30+, LG V35 ThinQ, Stylo 2 V, LG K20 V, ZONE4, LG Q7, DM-01K, Nexus 5X, LG K9, LG K11
Motorola Moto Z Play Droid, moto g(6) plus, Moto Z Droid, Moto X (4), Moto G Plus (5th Gen), Moto Z (2) Force, Moto G (5S) Plus, Moto G (5) Plus, moto g(6) play, Moto G (5S), moto e5 play, moto e(5) play, moto e(5) cruise, Moto E4, Moto Z Play, Moto G (5th Gen)
Nokia Nokia 8, Nokia 7 plus, Nokia 6.1, Nokia 8 Sirocco, Nokia X6, Nokia 3.1
OnePlus OnePlus 6, OnePlus5T, OnePlus3T, OnePlus5, OnePlus3
Oppo CPH1803, CPH1821, CPH1837, CPH1835, CPH1819, CPH1719, CPH1613, CPH1609, CPH1715, CPH1861, CPH1831, CPH1801, CPH1859, A83, R9s Plus
Positivo Twist, Twist Mini
Samsung Galaxy A8 Star, Galaxy J7 Star, Galaxy Jean, Galaxy On6, Galaxy Note9, Galaxy J3 V, Galaxy A9 Star, Galaxy J7 V, Galaxy S8 Active, Galaxy Wide3, Galaxy J3 Eclipse, Galaxy S9+, Galaxy S9, Galaxy A9 Star Lite, Galaxy J7 Refine, Galaxy J7 Max, Galaxy Wide2, Galaxy J7(2017), Galaxy S8+, Galaxy S8, Galaxy A3(2017), Galaxy Note8, Galaxy A8+(2018), Galaxy J3 Top, Galaxy J3 Emerge, Galaxy On Nxt, Galaxy J3 Achieve, Galaxy A5(2017), Galaxy J2(2016), Galaxy J7 Pop, Galaxy A6, Galaxy J7 Pro, Galaxy A6 Plus, Galaxy Grand Prime Pro, Galaxy J2 (2018), Galaxy S6 Active, Galaxy A8(2018), Galaxy J3 Pop, Galaxy J3 Mission, Galaxy S6 edge+, Galaxy Note Fan Edition, Galaxy J7 Prime, Galaxy A5(2016)
Sharp シンプルスマホ4, AQUOS sense plus (SH-M07), AQUOS R2 SH-03K, X4, AQUOS R SH-03J, AQUOS R2 SHV42, X1, AQUOS sense lite (SH-M05)
Sony Xperia XZ2 Premium, Xperia XZ2 Compact, Xperia XA2, Xperia XA2 Ultra, Xperia XZ1 Compact, Xperia XZ2, Xperia XZ Premium, Xperia XZ1, Xperia L2, Xperia X
Tecno F1, CAMON I Ace
Vestel Vestel Z20
Vivo vivo 1805, vivo 1803, V9 6GB, Y71, vivo 1802, vivo Y85A, vivo 1726, vivo 1723, V9, vivo 1808, vivo 1727, vivo 1724, vivo X9s Plus, Y55s, vivo 1725, Y66, vivo 1714, 1609, 1601
Vodafone Vodafone Smart N9
Xiaomi Mi A2, Mi A2 Lite, MI 8, MI 8 SE, MIX 2S, Redmi 6Pro, Redmi Note 5 Pro, Redmi Note 5, Mi A1, Redmi S2, MI MAX 2, MI 6X
ZTE BLADE A6 MAX

Thank you to everyone internally and externally who helped make Android safer and stronger in the past year. Together, we made a huge investment in security research that helps Android users everywhere. If you want to get involved to make next year even better, check out our detailed program rules. For tips on how to submit complete reports, see Bug Hunter University.

Android Studio 3.2

$
0
0

Posted by Jamal Eason, Product Manager, Android

Today, Android Studio 3.2 is available for download. Android Studio 3.2 is the best way for app developers to cut into the latest Android 9 Pie release and build the new Android App bundle. Since announcing this update of Android Studio at Google I/O '18, we have refined and polished 20+ new features and focused our efforts on improving the quality for this stable release of Android Studio 3.2.

Every developer should use Android Studio 3.2 to transition to using an Android App Bundle, the new app publishing format. With very minimal work, you can generate an app bundle with Android Studio. Once you upload your app bundle to Google Play you can distribute smaller, optimized apps to your users. Early adopters have already seen between 11% - 64% in app size savings with app bundles over the legacy APK app size.

Another feature you do not want to miss is the Energy Profiler. This new profiler gives you a set of tools that will help you diagnose and improve the energy impact of your app. Better device battery life is one of the top most user requests, and with the Energy Profiler in Android Studio 3.2, you can do your part in improving device battery life by making sure your app is using the right amount of energy at the right time.

Lastly, you should also check out the new Android Emulator Snapshots feature. By using this feature, you can quickly take a snapshot of the current state of your emulator which includes the current state of the screen, apps, and settings. You can resume or boot into your emulator snapshot in under 2 seconds. For any app developer looking for super- fast boot times, or seeking to run tests in a predictable Android environment, Android Emulator Snapshots is a game changing feature for app development

On top of these major features, there are 20 new features plus many under-the-hood quality refinements in Android Studio 3.2. By using Android Studio 3.2, you can also develop for the latest technologies ranging from Android Jetpack, to the latest in Google Artificial Intelligence (AI) APIs with Android Slices.

Thank you to those who gave your early feedback on both the canary and beta releases. Your feedback helped us improve the quality and features in Android Studio 3.2. If you are ready for the next stable release, and want to use a new set of productivity features, Android Studio 3.2 is ready to download for you to get started.

Below is a full list of new features in Android Studio 3.2, organized by key developer flows.

Develop

  • Slices support - Slices is a new way to tap into the built-in Android AI capabilities by surfacing app content in Google Search suggestions and the Google Assistant. Android Studio 3.2 has a built-in template to help you extend your app with the new Slice Provider APIs as well as new lint checks to ensure that you're following best practices when constructing the slices. To use, right-click on a project folder, and navigate to NewOtherSlice Provider. Learn more.

Slices Provider Template

  • Sample Data - This feature allows you to use placeholder data to aid in the design of your app. This will help you visualize layouts that depend on runtime data. You can add built-in sample data to populate views such as RecyclerViews, ImageViews, and TextViews via a popup-window in the Layout Editor. Learn more.
  • Material Design Update - When you start migrating from the Android Design support library to the new MaterialComponents app theme and library, Android Studio 3.2 will offer you access to new and updated widgets such as BottomAppBar, buttons, cards, text fields, new font styles and more. Learn more.
  • CMakeList Editing Support - For those using C/C++ in their app, Android Studio has better support for CMake. With this release of Android Studio 3.2, code completion and syntax highlighting now works on common CMakeList build script commands.
  • What's New Assistant - Android Studio 3.2 has a new assistant panel that opens automatically after an update to inform you about the latest changes to the IDE. You can also open the panel by navigating to Help → What's New in Android Studio.
  • AndroidX Refactoring Support - One of the components of Android Jetpack is the introduction of the Android extension libraries (AndroidX) as a replacement for the Android Support Libraries. To add AndroidX to a new project you just need to add android.useAndroidX=true to your gradle.properties file. Additionally, Android Studio 3.2 has a new built-in refactoring action to help migrate your project the new namespace and dependencies. Also if you have any Maven dependencies that have not migrated to the AndroidX namespace, the Android Studio build system will automatically convert those project dependencies as well. Learn more.
  • IntelliJ Platform Update - Android Studio 3.2 includes the IntelliJ 2018.1.6 platform release. This IntelliJ release adds many improvements to dataflow analysis, debugging, new inspections, inline external annotations, partial Git commits, plus much more. Learn more.
  • Kotlin Update - Android Studio 3.2 bundles Kotlin 1.2.61, with support for the Kotlin-friendly Android 9 Pie SDK. Learn more.

Build

  • Android App Bundle - The Android App Bundle is the new app publishing format designed to help you deliver smaller APKs to your users and reduce download size of your app. Google Play's new app serving model, called Dynamic Delivery, processes your app bundle to generate and serve optimized APKs for each user's device configuration, so they download only the code and resources they need to run your app. With Android Studio 3.2 or via the command line, you can easily build your code as an app bundle and get the benefit of smaller APKs based on language, screen density, and ABIs with no changes to your app code. Learn more.

Build Android App Bundle

  • D8 Desugaring - In some cases, new Java Language features require new bytecodes and language APIs. However, older Android devices may not support these features. Desugaring allows you to use these features on older devices by replacing new bytecodes and language APIs with older ones during the build process. D8 desugaring is turned on by default for Android Studio 3.2 and you can now use most of the latest language changes while targeting older devices.
  • R8 Optimizer - Starting with Android Studio 3.2, we are starting the transition to use R8 as a replacement for ProGuard to optimize and shrink Java language bytecode. R8 is still experimental, so we do not recommend publishing your app using R8 yet, but it is a good time to give the Android Studio team early feedback so we can make any adjustments before R8 fully replaces ProGuard. Learn more.

Test

  • Emulator Snapshots - The latest release of the Android Emulator allows you to create a snapshot of the current state of your emulator and boot up and switch into any snapshot in under 2 seconds. Built upon the Android Emulator Quickboot feature, Android Snapshots are even faster to save and load with this stable release due to under-the-hood speed enhancements. When testing and developing your app, Android snapshots allow you to pre-configure an Android Virtual Device (AVD) snapshot with the presets, apps, data and settings that you want in-place, and repeatedly go back to the same snapshot. Learn more.

Android Emulator Snapshots

  • Microsoft® Hyper-V™ Support - You can now run the Android Emulator on Windows® 10 computers that have Hyper-V enabled. Intel HAXM is still the default hypervisor for the fastest Android Emulator experience. However,thanks to recent open source contributions by Microsoft, and the addition of the new Windows Hypervisor Platform (WHPX) API, the Android Emulator can coexist with other Hyper-V-backed applications, like local Virtual Machines, using the new Hyper-V Support. Learn more.
  • AMD® Processor Support - AMD Processors are now supported by the Android Emulator on Windows 10. Previously running the Android Emulator was limited to slow software emulation when running Windows, but developers who have an AMD processor can now have hardware accelerated performance. Learn more.
  • Screen Record in Android Emulator - You can now record both screen and audio on any Android API level with the new screen record feature in the Android Emulator. In the past, screen recording on a physical Android device only worked on Android 4.4 KitKat (API 19) and above with no audio, with limited Android Emulator support. With the latest Android Emulator (v28.0.+) you no longer have this restriction. As an added bonus, there is a built-in conversion to output to GIF and WebM. You can trigger the new screen record feature via the Android Emulator Extended Controls panel, command line and from Android Studio. Lean more
  • Virtual Scene Camera for Android Emulator - The new Virtual Scene camera in the Android Emulator helps you to develop for ARCore, Google's platform for building augmented reality experiences. The emulator is calibrated to work with ARCore APIs for AR apps and also allows you to inject virtual scene bitmap images. The virtual scene camera can also be used as a regular HAL3 compatible camera. Learn more.
  • ADB Connection Assistant - Android Studio 3.2 has a new assistant system to help troubleshoot your Android ADB device connections issues. The ADB Connection Assistant walks you through common troubleshooting steps to connect your Android device to your development machine. You can trigger the assistant from the Run dialog box or by navigating to ToolsConnection Assistant . Learn more.

Optimize

  • Energy Profiler - Battery life is a key concern for many phone users, and your app may impact battery life more than you realize. The new Energy Profiler in the Android Studio performance profiler suite can help you understand the energy impact of your app on an Android device. You can now visualize the estimated energy usage of system components, plus inspect background events that may contribute to battery drain. To use the energy profiler, ensure you are connected to an Android device or emulator running Android 8.0 Oreo (API 26) or higher. Learn more.

Energy Profiler

  • System Trace - The new System Trace feature in the CPU Profiler allows you to inspect how your app interacts with system resources in fine-grained detail. Inspect exact timings and durations of your thread states, visualize where your CPU bottlenecks are across all cores, and add custom trace events to analyze. To use system trace, start profiling your app, click into the CPU Profiler, and then choose the System Trace recording configuration. Learn more.
  • Profiler Sessions - We now automatically save Profiler data as "sessions" to revisit and inspect later while you have Android Studio open. We've also added the ability to import and export your CPU recordings and heap dumps for later analysis or inspection with other tools. Learn more.
  • Automatic CPU Recording - You can now automatically record CPU activity using the Debug API. After you deploy your app to a device, the profiler automatically starts recording CPU activity when your app calls startMethodTracing(String tracePath), and stops recording when your app calls stopMethodTracing(). Similarly, you can also now automatically start recording CPU activity on app start-up by enabling Start Recording a Method Trace on Startup option in your run configuration. Learn more.
  • JNI Reference Tracking - For those of you who have C/C++ code in your Android app, Android Studio 3.2 now allows you to inspect the memory allocations of your JNI code in the Memory Profiler. As long as you deploy your app to a device running Android 8.0 Oreo (API 26) and higher, you can drill down into the allocation call stack from your JNI reference. To use the feature, start a memory profiler session, and select the JNI Heap from the Live Allocation drop-down menu. Learn more.

To recap, the latest canary of Android Studio 3.2 includes these new major features:

Develop
  • AndroidX Refactoring
  • Sample Data
  • Material Design Update
  • Android Slices
  • CMakeList editing
  • What's New Assistant
  • New Lint Checks
  • Intellij Platform Update
  • Kotlin Update

Build

  • Android App Bundle
  • D8 Desugaring
  • R8 Optimizer
Test
  • Android Emulator Snapshots
  • Screen Record in Android Emulator
  • Virtual Scene Android Emulator Camera
  • AMD Processor Support
  • Hyper-V Support
  • ADB Connection Assistant

Optimize

  • Energy Profiler
  • System Trace
  • Profiler Sessions
  • Automatic CPU Recording
  • JNI Reference Tracking

Check out the release notes for more details.

Getting Started

Download the latest version of Android Studio 3.2 from the download page. If you are using a previous canary release of Android Studio, make sure you update to Android Studio Canary 14 or higher. If you want to maintain a stable version of Android Studio, you can run the stable release version and canary release versions of Android Studio at the same time. Learn more.

To use the mentioned Android Emulator features make sure you are running at least Android Emulator v28.0.7+ downloaded via the Android Studio SDK Manager.

We appreciate any feedback on things you like, and issues or features you would like to see. Please note, to maintain high product quality, a couple features (e.g. Navigation Editor) you saw in earlier release channels are not enabled by default in the stable release channel. If you find a bug or issue, feel free to file an issue. Connect with us -- the Android Studio development team ‐ on our Google+ page or on Twitter.

Helping more families set digital ground rules with Family Link

$
0
0

Parents constantly tell us that they want their kids to experience the best of what tech has to offer–while also developing a healthy relationship with technology. Giving parents the tools they need to make the choices that are right for their families is critical, and we take our role here very seriously. Last year we launched the Family Link app to help parents stay in the loop while their kids are using Android devices. Family Link helps parents keep an eye on screen time, manage the apps their kids can use, and more. Over the coming days, we’ll make Family Link available to more families, on more devices, and in nearly every country in the world. 

Family Link can now help parents with teens manage technology

Family Link originally launched for kids under-13, but we’ve heard overwhelmingly from parents that the app is still useful as their kids enter their teen years. This week, parents around the world will be able to use Family Link to supervise their teen’s existing Google Account for the first time (see applicable age for a teen in your country). There are some differences when supervising a teen’s account with Family Link. For example, teens are free to turn off supervision if they choose to, but we let parents know. Ultimately, it’s up to each individual family to have a conversation and decide what’s right for them.

Better Chromebook support for kids and teens

The need for supervision doesn’t end with mobile devices. Now, Family Link is available for Chromebook for kids and teens, allowing parents to manage website restrictions and account settings for their child from their device. Soon, parents will also be able to set screen time limits and manage the apps their child can use on Chromebooks.

Continuing to grow together

With more parents in more places able to use Family Link, we want to hear your thoughts on how we’re doing. If you want to share your ideas with us, just open the Family Link app, click the menu in the top left corner and tap “Help and feedback.”

Source: Android


Expanding Emergency Location Service in Android to the U.S.

$
0
0

Accurately locating someone during an emergency call is critical for reducing response time and can be the difference between life and death. More than 80 percent of emergency calls come from mobile phones, but locating these phones can be challenging as traditional emergency location technologies can fail indoors or have a radius that’s too big to be useful.


In 2016, we announced Emergency Location Service (ELS) in Android. ELS provides a faster, more accurate location to emergency communications centers when an Android user places an emergency call, helping save lives by shortening emergency response times. It provides a more accurate location both indoors and outdoors by using a combination of GPS, Wi-Fi, mobile networks and sensors—the same high-accuracy location you see when using Google Maps.


Over the last two years, we’ve been expanding ELS worldwide; it's now available in 14 countries and provides location to emergency centers for more than 140,000 calls per day. Today we’re announcing the launch of ELS in the U.S. with RapidSOS, T-Mobile and West, to bring more accurate location more quickly to emergency centers.
android emergency location services

How Emergency Location Services in Android works

ELS is supported on 99 percent of Android devices (version 4.0 and above). The ELS service activates where it is supported by your wireless provider or emergency infrastructure provider. We partner with wireless providers and public safety organizations to activate ELS in a country. You don't need to install a separate app, update your OS, or have special hardware to benefit from more accurate location. The location is computed on the device and delivered directly to emergency providers—without passing through Google servers, and only when you explicitly call an emergency number.

Bringing more accurate emergency location to the U.S.

In partnership with emergency technology company RapidSOS, we provide ELS location directly to emergency communications centers through their secure, IP-based data platform. RapidSOS integrates with existing software at emergency centers in the U.S. to provide a faster, more accurate location with ELS. In testing the technology in the U.S., emergency centers have told us ELS has already helped save lives in their jurisdiction, decreasing the average uncertainty radius from 159 meters to 37 meters (from 522 feet to 121 feet). At the Collier County Sheriff's office in Florida, a caller who had given an incorrect address was able to be found thanks to ELS. And in Loudon County, TN, ELS helped emergency responders get to a non-English speaking caller who was struggling to communicate her address.

ELS is also available for Android users on T-Mobile in the U.S. If you’re on T-Mobile’s network and make a call to 911, your Android phone can send your location to the emergency center to help first responders locate you quickly. Wireless providers like T-Mobile have existing ways to share emergency locations with emergency centers, but this integration with ELS will help deliver higher accuracy locations faster than before.

Finally, we’ve already launched ELS in the U.S. Virgin Islands through a partnership with West and a regional wireless provider, Viya. West is an emergency technology company that works directly with wireless providers. For Android users on Viya, our integration with West allows your more accurate location to be delivered more quickly with ELS to emergency centers through existing channels by wireless providers.

Helping users around the world

As we've launched ELS around the world, we've heard about the impact that our more accurate location has made in critical, emergency situations. In Austria, a mountain biker in a remote, heavily forested area suffered a serious accident and called emergency services for help. The legacy emergency location systems provided a location with a radius of more than 900 meters (about half a mile), while ELS was able to provide a location within 12 meters (39 feet) to help first responders locate the biker.

In New Zealand, Fire and Emergency received a call from someone who had seen a fire while he was driving along a rural highway. The caller didn’t know where he was on the highway. Using ELS, Fire and Emergency New Zealand was able to locate the caller and the fire, and dispatch a crew to put the fire out.

As we continue to expand ELS in Android in the U.S. and to additional regions and countries, we’re grateful for the opportunity to provide assistance when our users need it most. To learn more, check out our website at https://crisisresponse.google/els.

Source: Android


Tips from the people behind your favorite Google products

$
0
0

I’m one of those people who always cuts it close at the airport—it’s a race through security, with just enough time to grab the airline essentials: water bottle, magazine, a soft pretzel if I’m lucky. But I just learned that I can whip out Google Maps to find my way around the airport (by searching the airport name and terminal number), so I no longer waste time running around looking for my snack of choice.

For two decades, Google has built products that make my life more useful. Eight of these products now have a billion users, and with all that extra time at the airport, I got to thinking—how many other unknown tips and tricks are out there? Since Google is celebrating its 20th birthday this month, I present a party favor: tips on Google’s most-used products, straight from the people who helped build them.

Search

  • For lovers of covers:Try searching for a song and then tapping “other recordings” for different renditions.
  • Don’t burn daylight: Make the most of your daylight hours by knowing when the sun will go down. Search [sunset] to get the time the sun will set today.
  • For content connoisseurs:If you’re a fan of bingeable TV shows or a movie buff, you can see all the places to stream any show or film by searching [watch] followed by the title. (Head’s up: this is available in the U.S., Great Britain, Australia, Germany and India). 
Emily Moxley, Director of Product Management


Maps

  • Beat the crowds:Use Google Maps to find out the estimated wait times and popular times to visit your favorite restaurants and businesses. 
  • Don’t get lost in the parking lot:If you’ve ever spent way too long searching for your parked car, this tip’s for you. After navigating to your destination, tap on the blue dot and then “Set as parking location” so you can always find your way back to your parking spot.
  • Quickest route to the airport snacks:If you’re flying to a new place, you can use Google Maps to help you find your way around an airport. A quick search for an airport terminal name, say “SFO Terminal 1,” will show you the lay of the land, including nearby gates, lounges, restaurants and stores.
Dane Glasgow, VP of Product


YouTube

  • Just add popcorn:Developed to cut down on glare and give you that movie theater experience, Dark Theme turns your background dark while you’re watching YouTube. It’s available on desktop, iOS and now rolling out to Android. 
  • Pick your pace:Speed up or slow down the playback of a video by tapping on the three dots at the bottom right of any video. 
  • Take a shortcut:While watching a YouTube video, use the numbered keys to seek in a video. For example, hitting “2” will take you 20 percent into the video, “6” will take you to 60 percent into the video, “0” will restart the video. 
Brian Marquardt, Director of Product Management


Gmail

  • The ultimate to-do list: Open Tasks in your side panel within Gmail, then drag and drop emails to turn your messages into action items. 
  • Shhhh:Declutter your inbox with Gmail’s mute feature, which pushes the entire conversation to your archive and any future conversations on the thread bypass your inbox to be automatically archived as well. 
  • Take it back:Don’t fret over embarrassing typos, unintentional reply-alls, or other email taboos. In your Gmail settings, just implement a 5-30 second cancellation period on your sent emails and once you’ve fired one off, you’ll receive a prompt to “Undo.”

Kevin Smilak, Engineering Director


Google Drive

  • Give your docs a gold star:Find your favorite Drive items by starring your most important docs within the Drive main menu, and then bookmarking your Starred page. 
  • File_name_V2:Freeze moments in time by naming different versions of the docs you edit frequently. In a Doc, Sheet, or Slides go to File > Version History > Name current version. Name any version then access it easily from "Version history" by name. 
  • Your search is our command:Google Drive makes the text within all of the images and PDFs you upload searchable. Try searching for a phrase that you know is inside a picture or PDF, which is especially helpful when you can’t remember your filename. 
Alexander Vogenthaler, Director of Product Management


Android

  • Lost and found:If you’ve misplaced your Android phone, Find My Device lets you locate it by signing into your Google account. Or you can call it directly from a browser by typing “find my device” on Google. Lock your phone remotely or display a message on the lock screen, so if someone finds it they know who to contact. If you’re convinced it’s lost for good, you can erase all your data.
  • Always reachable:Don’t miss any urgent phone calls and messages from important contacts like close family members or your child’s school, even when you have Do Not Disturb turned on. Just add a star to people that matter to you, and then allow calls and messages from “starred contacts only” in Do Not Disturb settings. 
  • Use your voice:You can ask your Google Assistant to handle tasks on your Android phone (running Android 6.0 Marshmallow or later). Start by saying “OK Google,” then try “take a screenshot,” “turn on flashlight,” or “open WiFi setting.” You can even ask to “take a selfie”—this will open the camera app and start a countdown. Cheeeeeeeese. 
Sagar Kamdar, Director of Product Management


Google Play

  • When you’re good with faces, but not names:Just hit pause on your movie, tap the circle around the actor or actress's face, and learn more about them and what other movies they’ve been in.
  • Read like a superhero: When you’re reading a comic on your phone, tap on a voice bubble and use your volume buttons to zoom in on the dialogue between two characters.
  • What you wish for:You can create a wishlist to keep track of items you want to install or purchase on Google Play.
Kara Bailey, Global Merchandising Director


Chrome

  • Access history across devices:Open Chrome and click on “History.” From the drop down menu, click “Full History” and “Tabs From Other Devices.” If you’re signed into the same Google account on both your phone and your computer, you’ll see the article you were just about to finish on your way into work.
  • Keeping tabs on your tabs:You can save eight days of time per year using keyboard shortcuts. Try this one in Chrome: jump between tabs at light speed by pressing Ctrl and the tab number you want to go to (i.e., Ctrl+1, Ctrl+2, Ctrl+3).
  • 👀☝😀 = 🎉. Right-click in any text field for a shortcut to access emoji on any platform Chrome can be found.
Ellie Powers, Group Product Manager, and Chris Beckmann, Product Management Director 

So many tips, so much saved time.

Source: Gmail Blog


Technology for today’s world: helping you reclaim a sense of balance

$
0
0

“Focus on the user and all else will follow.” It’s one of the first principles Google laid out in the early days, and it’s still a guiding force as we build new products. And these days, focusing on the user means understanding that, for many people, technology has become a source of distractions, rather than a useful tool. Research the Android team released earlier this month indicates that mobile devices can create a sense of habit and obligation that is hard to break, even as people look for ways to create a healthy relationship with technology.

With this in mind, over the past year, teams across Google have turned their attention to building features that help you better understand how you use your devices and apps, disconnect when you want, and create healthy habits for your whole family. Here’s a look at some of the ways we’re helping you reclaim a sense of balance and focus on what matters most to you:

Digital wellbeing data and controls for your Android phone

Android 9 Pie lets you see a dashboard of how you’re spending time on your device, including how many times you’ve unlocked your phone, and how many notifications you’ve received. You can also set time limits on apps, like “30 minutes for Chrome.” When you’re close to the limit, you’ll get a nudge reminding you, and when time is up you won’t be able to use the app anymore (unless you cheat!). You can also try Wind down, which helps you remember to stop scrolling and get to sleep. These features are currently in beta for Pixel users.

Digital ground rules for your family

Every year, more and more kids have access to connected devices: according to our research, 75 percent of kids age 6-12 own or share a tablet, and 52 percent of kids age 6-12 own or share a smartphone. Our Family Link app, which is now available in nearly every country around the world, helps parents better manage their kids’ experience with technology. Family Link lets parents set screen time limits, approve or block certain apps, remote lock devices, and view activity reports so they can stay in the loop on how their kids are exploring.

Last week we shared that in addition to using Family Link for children under 13, parents around the world can use Family Link to supervise their teen’s existing Google Account (see applicable age for a teen in your county).

You choose how you YouTube

It’s easy to lose track of time when you’re watching YouTube videos. That’s part of the fun! But for those times you want to set some boundaries, YouTube has added features to help you understand how much time you’re spending in the app and help you take a break. The new Time Watched profile tells you exactly how much time you’re spending in the app, and you can set a reminder for yourself to take a break once you’ve hit a certain amount of time. We’ve also added the option for you to bundle YouTube notifications into one daily digest. You can even choose what time of day you want to see it.

We’ve always aimed to build products that help you get things done efficiently and free you up to focus on the other things that matter to you—from Search, where our goal has always been to get you an answer as fast as possible, to tools like Smart Reply in Gmail which suggest text for you. That’s more important now than ever, and we’ll keep building with that principle in mind.

The world we live in today is very different from the one when Google started back in 1998. We’re no longer using clunky computers to perform simple searches and send basic emails—with the phones in our pockets, we can accomplish things we couldn’t have come close to doing with ye olde desktop. But as technology becomes increasingly woven into our day-to-day, making sure it’s improving life—instead of distracting from it—is more important than ever. That’s focusing on the user, and that’s what we’re continuing to do.

Source: Android


Use your voice to access the world with a new Android app

$
0
0

Everyone can benefit from hands-free support when using technology, but for the 62 million people in the U.S. with motor and mobility impairments, it can be a vital requirement. For Stefanie Putnam, a quadriplegic and a para-equestrian driver, tasks like taking photos, sending texts and composing emails could be daunting.

Stefanie was one of several people the Google Accessibility team worked with to test early prototypes of a feature which allowed people to control their Android device using voice-only commands. Her feedback—and that of other testers—was instructional in shaping a new product we’ve just released called Voice Access.

“After using this product for probably about 10 seconds, I think I’m falling in love with it,” said Stefanie. “You use your voice and you’re able to access the world. It has become a huge staple in my life.”

Stefanie Putnam testing Voice Access

Stefanie Putnam testing Voice Access

Voice Access provides a hands-free experience for Android, letting people navigate through apps, compose and edit text, and talk to the Google Assistant. It provides more fine-grained controls than other voice commands you might use on your phone—for example, letting you use your voice to "click" buttons and controls within apps, or scroll and navigate app screens. And while there are great benefits for individuals with Parkinson's disease, multiple sclerosis, arthritis, spinal cord injury and more, Voice Access can also provide value to people who don’t have a disability—people juggling with groceries or in the middle of cooking.

Screenshots of voice commands used by Voice Access

Screenshots of voice commands used by Voice Access

When using Voice Access, you can compose and edit a text message hands free by saying “Ok Google,” and open your favorite app with the “open” command. Then, select the text field by speaking the number Voice Access displays next to it. After saying your message out loud, like “would you like to meet for lunch tomorrow?” you can edit the text using phrases like “replace tomorrow with Saturday” to change the day you want to meet. Speaking commands such as “delete the line” or “undo” will start over and when you’ve finished, you can say “stop listening.”  There are many more examples of available commands on oursupport page.

Screenshot of an Android homepage using Voice Access

Screenshot of an Android homepage using Voice Access

Feedback like Stefanie’s consistently shapes the future of Google’s products. You can help our Central Accessibility team build even more accessible products by signing up to participate in future user studies.   

Voice Access is available globally supporting English commands, with additional language support coming in the future.  Learn more about Voice Access  and download the app from Google Play today.

Making a difference with Android and Google Play

$
0
0

As mobile platforms with global scale and billions of users, a core tenet of Google Play and Android is to have a positive effect on and change the communities in which we operate. Over the years, we’ve facilitated innumerable connections between people, developers, and nonprofits, and in the video below, we share the stories of four incredible apps that create social impact around the world.

My Earthquake Alerts sends free, real time push notifications to alert users of severe earthquakes close to their location. This warning system can mean the difference between lives saved and lives lost when disaster strikes.

In situations where access to high-quality education is limited or costly, an app can help ease the strain. One example is Prepup, an effective mobile tool for students to prepare for common exams written in Nigeria and other African countries.

Positive impact surrounding Android apps is often created both on- and off- mobile. The founders of Forest: Stay focused are building an effective tool to help people disconnect from their smartphones for short periods of time and are also contributing to real world reforestation efforts by allowing in-app actions to become real trees being planted where they are needed most.

Some apps can also help improve the financial outcomes for their users. For example, Fresh EBT enables US users to easily view their food stamps balance, track their spending habits, and find nearby shops that accept EBT. The app can also help people save money with coupons. We believe that financial health represents a sizable social impact opportunity for fintech entrepreneurs on Google Play and Android.

If you are a developer, then head over to this post on Medium to learn about the massive opportunity to drive positive social impact with Android and how to bring your social impact idea to mobile and achieve sustainable growth.


Kotlin Momentum for Android and Beyond

$
0
0

Posted by James Lau (@jmslau), Product Manager

Today marks the beginning of KotlinConf 2018 - the largest in-person gathering of the Kotlin community annually. 2018 has been a big year for Kotlin, as the language continues to gain adoption and earn the love of developers. In fact, 27% of the top 1000 Android apps on Google Play already use Kotlin. More importantly, Android developers are loving the language with over 97% satisfaction in our most recent survey. It's no surprise that Kotlin was voted as the #2 most-loved language in the 2018 StackOverflow survey.

Google supports Kotlin as a first-class programming language for Android development. In the past 12 months, we have delivered a number of important improvements to the Kotlin developer experience. This includes the Kotlin-friendly SDK, Android KTX, new Lint checks and various Kotlin support improvements in Android Studio. We have also launched Kotlin support in our official documentation, new flagship samples in Kotlin, a new Kotlin Bootcamp Udacity course, #31DaysOfKotlin and other deep dive content. We are committed to continuing to improve the Kotlin developer experience.

As the language continues to advance, more developers are discovering the benefits of Kotlin across the globe. Recently, we traveled to India and worked with local developers like Zomato to better understand how adopting Kotlin has benefited their Android development. Zomato is a leading restaurant search & discovery service that operates in 24 countries, with over 150 million monthly users. Kotlin helped Zomato reduce the number of lines of code in their app significantly, and it has also helped them find important defects in their app at compile time. You can watch their Kotlin adoption story in the video below.

Android Developer Story: Zomato uses Kotlin to write safer, more concise code.

Going beyond Android, we are happy to announce that the Google Cloud Platform team is launching a dedicated Kotlin portal today. This will help developers more easily find resources related to Kotlin on Google Cloud. We want to make it as easy as possible for you to use Kotlin, whether it's on mobile or in the Cloud.

Google Cloud Platform's Kotlin Homepage

Adopting a new language is a major decision for most companies, and you need to be confident that the language you choose will have a bright future. That's why Google has joined forces with JetBrains and established the Kotlin Foundation. The Foundation will ensure that Kotlin continues to advance rapidly, remain free and stay open. You can learn more about the Kotlin Foundation here.

It's an exciting time to be a Kotlin developer. If you haven't tried Kotlin yet, we encourage you to join this growing global community. You can get started by visiting kotlinlang.org or the Android Developer Kotlin page.

Viewing all 1776 articles
Browse latest View live